LNMP Introduction
The LNMP One-Key Installation Package is a Linux Shell that can be used to install LNMP (Nginx/MySQL/PHP), LNMPA for CentOS/RHEL/Fedora/Aliyun/Amazon, Debian/Ubuntu/Raspbian/Deepin/Mint Linux VPS or standalone host. Nginx/MySQL/PHP/Apache), LAMP (Apache/MySQL/PHP) production environment shell program.
System Requirements
- CentOS/RHEL/Fedora/Debian/Ubuntu/Raspbian/Deepin/Aliyun/Amazon/Mint Linux distribution
- Requires 5GB or more of free space, MySQL 5.7, MariaDB 10 need at least 9GB of free space.
- Need more than 128MB of memory (128MB small memory VPS, Xen need to have SWAP, OpenVZ must have at least 128MB vSWAP or burst memory), pay attention to small memory do not use 64-bit system!
- Installing MySQL 5.6 or 5.7 and MariaDB 10 requires more than 1G of memory, and a higher version requires at least 2G of RAM!
- The VPS or server must be set up network. must use the network source not the CD source, and the VPS/Server DNS should be available!
- Case sensitivity under Linux, please pay attention when entering commands!
- If you have MySQL/MariaDB installed via yum or apt-get, please backup the data and other related files yourself!
- CentOS 5, Debian 6 and earlier versions of its official website has ended support ,is not available!
1.Log in to the VPS or server using putty or a similar SSH tool
Run after login:
|
1 |
screen -S lnmp |
If the prompt screen: command not found command does not exist, you can execute it: yum install screen or apt-get install screen. For details, refer to the screen tutorial.
2.Install LNMP stable version
|
1 |
wget http://soft.vpser.net/lnmp/lnmp1.5.tar.gz -cO lnmp1.5.tar.gz && tar zxf lnmp1.5.tar.gz && cd lnmp1.5 && ./install.sh lnmp |
If you need to install LNMPA or LAMP, replace the parameter lnmp after ./install.sh with lnmpa or lamp. If you need to change the website and database directory, customize the Nginx parameters, PHP parameter module, open lua, etc., you need to modify the lnmp.conf file in the installation package directory before running the ./install.sh command. For details, see the lnmp.conf file parameter description.
lnmp.conf configuration file parameter description
Download_Mirror
default download mirror
Nginx_Modules_Options
Add Nginx modules or other compilation parameters
—add-module=/third-party module source directory
PHP_Modules_Options
Add PHP module or compile parameters
—enable-exif Some modules need to install dependencies in advance
MySQL_Data_Dir
MySQL database directory settings
Default /usr/local/mysql/var
MariaDB_Data_Dir
MariaDB database directory settings
Default /usr/local/mariadb/var
Default_Website_Dir
Default virtual host website directory
Default /home/wwwroot/default
Enable_Nginx_Openssl
Nginx uses the new version of openssl
Default y, it is recommended not to modify, y is enabled and enabled to http2
Enable_PHP_Fileinfo
Install the php fileinfo module.
Default n, depending on your situation, if need it, change it to y.
Enable_Nginx_Lua
Whether to install lua support for Nginx
Default n, install lua can use some lua-based waf website firewall
If the prompt wget: command not found is used, install it using the yum install wget or apt-get install wget command.
After running the above LNMP installation command, the following prompt will appear:
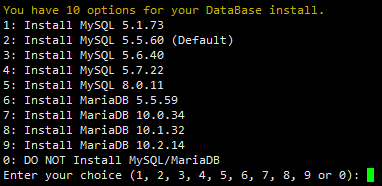
Currently, there are more options for MySQL, MariaDB, and no database installation. Note that MySQL 5.6, 5.7 and MariaDB 10 must be selected for higher configurations of memory above 1G! For example, only need to install the database in the lnmp installation package directory: ./install.sh db
Enter the serial number corresponding to the MySQL or MariaDB version and press Enter to proceed to the next step.

Set the MySQL root password (for security, do not enter the direct carriage return will be set to lnmp.org # random number) If you have errors to delete, you can press Ctrl and then press Backspace to delete (in some cases, only need Backspace) key). Enter and press Enter to proceed to the next step, as shown below:

Ask if you need to enable MySQL InnoDB, InnoDB engine is enabled by default, it is recommended to open, directly enter or enter y, if you do not need the engine can input n, (MySQL 5.7+ version can not close InnoDB), input is complete, enter Go to the next step.
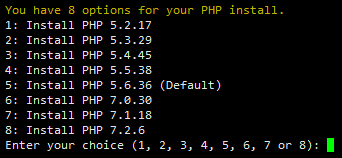
Note: When choosing the PHP 7+ version, you need to make sure that the PHP version is compatible with your own program.
Enter the serial number of the PHP version you want to select, press Enter to go to the next step, choose whether to install memory optimization:
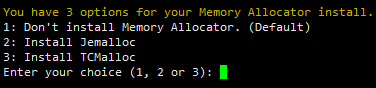
You can choose not to install anything, install Jemalloc or install TCmalloc, enter the corresponding serial number to enter, press Enter to the default is not install anything.
If it is LNMPA or LAMP, it will prompt to set the mailbox and select Apache.

“Please enter Administrator Email Address:”, you need to set the administrator’s Email Address, which will be displayed on the error page when an error is reported.
Then choose the Apache version

Enter the number sequence number in front of the corresponding version as prompted and press Enter.
After prompted “Press any key to install…or Press Ctrl+c to cancel”, press Enter to confirm the installation.
The LNMP script will automatically install and compile Nginx, MySQL, PHP, phpMyAdmin and other related components.
The installation time may vary from tens of minutes to several hours, mainly due to reasons such as the configuration speed of the machine.
3. the installation is complete
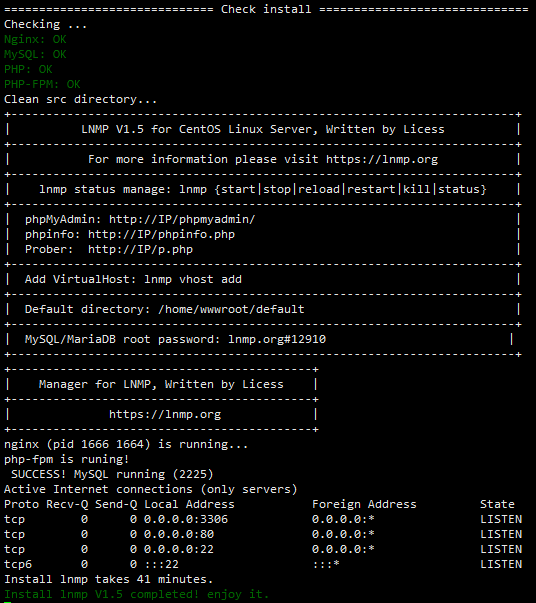
If Nginx: OK is displayed, MySQL: OK, PHP: OK And Nginx, MySQL, PHP are running, 80 and 3306 ports are present, and prompted the installation time and Install lnmp V1.5 completed! Enjoy it. It means that the installation has been successful.
Some systems may always be stuck in Install lnmp V1.5 completed! Enjoy it. Do not exit automatically, you can press Ctrl+c to exit.
Status management:
status management: lnmp {start|stop|reload|restart|kill|status}
status management: lnmp {nginx|mysql|mariadb|php-fpm|pureftpd} {start|stop|reload|restart|kill|status}
Nginx status management:/etc/init.d/nginx {start|stop|reload|restart}
MySQL status management:/etc/init.d/mysql {start|stop|restart|reload|force-reload|status}
Memcached status management:/etc/init.d/memcached {start|stop|restart}
PHP-FPM status management:/etc/init.d/php-fpm {start|stop|quit|restart|reload|logrotate}
PureFTPd status management: /etc/init.d/pureftpd {start|stop|restart|kill|status}
ProFTPd status management: /etc/init.d/proftpd {start|stop|restart|reload}
Redis status management: /etc/init.d/redis {start|stop|restart|kill}
Extensions (xcache/Redis/memcached/start), imageMagick, ionCube installation tutorial
These extensions and components are installed using ./addons.sh
Basic usage instructions: ./addons.sh {install|uninstall} {eaccelerator|xcache|memcached|opcache|redis|imagemagick|ioncube}
Different versions may display slightly different differences between the options and options. If there are multiple PHP versions under 1.4, you will be prompted to choose which PHP version to install.
LNMP software installation directory
Nginx directory: /usr/local/nginx/
MySQL directory: /usr/local/mysql/
The directory where the MySQL database located: /usr/local/mysql/var/
MariaDB directory : /usr/local/mariadb/
The directory where the MariaDB database located: /usr/local/mariadb/var/
PHP directory : /usr/local/php/
Multi-PHP version directory: /usr/local/php5.5/ The version number of the previous version 5.5 can be changed to other versions.
PHPMyAdmin directory: Version 0.9 is /home/wwwroot/phpmyadmin/ 1.0 and later is /home/wwwroot/default/phpmyadmin/ It is strongly recommended to rename this directory to a name that is not easy to guess. Phpmyadmin can download the new version from the official website.
Default website directory: Version 0.9 is /home/wwwroot/ 1.0 and later is /home/wwwroot/default/
Nginx log directory: /home/wwwlogs/
The directory where the virtual host configuration file added by /root/vhost.sh is located: /usr/local/nginx/conf/vhost/
PureFtpd directory: /usr/local/pureftpd/
PureFtpd web management directory: Version 0.9 is /home/wwwroot/default/ftp/ 1.0 is /home/wwwroot/default/ftp/
Proftpd directory: /usr/local/proftpd/
Redis directory: /usr/local/redis/
LNMP configuration file location
Nginx master configuration (default virtual host) file: /usr/local/nginx/conf/nginx.conf
Added virtual host configuration file: /usr/local/nginx/conf/vhost/domain.conf
MySQL configuration file: /etc/my.cnf
PHP configuration file: /usr/local/php/etc/php.ini
Php-fpm configuration file: /usr/local/php/etc/php-fpm.conf
PureFtpd configuration file: /usr/local/pureftpd/pure-ftpd.conf 1.3 and higher: /usr/local/pureftpd/etc/pure-ftpd.conf
PureFtpd MySQL configuration file: /usr/local/pureftpd/pureftpd-mysql.conf
Proftpd configuration file: /usr/local/proftpd/etc/proftpd.conf 1.2 and previous versions are /usr/local/proftpd/proftpd.conf
Proftpd user configuration file: /usr/local/proftpd/etc/vhost/username.conf
Redis configuration file: /usr/local/redis/etc/redis.conf
LNMPA directory file location
Apache directory: /usr/local/apache/
Apache configuration file: /usr/local/apache/conf/httpd.conf
Apache virtual host configuration file directory: /usr/local/apache/conf/vhost/
Apache default virtual host configuration file: /usr/local/apache/conf/extra/httpd-vhosts.conf
Virtual host configuration file name: /usr/local/apache/conf/vhost/domain name.conf
This article was first published by V on 2018-10-04 and can be reprinted with permission, but please be sure to indicate the original link address of the article :http://www.nginxer.com/records/lnmp-one-key-installation-package/